Pages

Friday, 20 December 2013

A Summer Sail And Crayfish Season: Time For A Feast


The crayfish season in the Cape opened on 15 December for non-commercial taking of crayfish.

Over here it means that we have to wait for the weather. Having a licence is the least of the problems of obtaining this delicacy from the sea.

We waited, planned and aimed for two days, depending on the weather. Crayfish season overlaps with the real windy season here in the Cape. However, this time there was a small cold front passing the Cape, allowing a brief respite from the howling southeaster.

We went out in a friend's yacht by the name of Moppie, a Sadler 32 sailing yacht named after the Cape style songs. Had a quiet sail from Gordon's Bay down to Rooiels where the crayfish grounds lie.

Of course, it looked like your church bazaar in a rural village with all the boats on the water. These included ourselves, being the only sailing vessel in the fleet, along with a plethora of rubber dinghies and other motor boats, rounded off with a middle aged couple from Rooiels on a paddleski. Fun on the water indeed!
There were some clouds around, with the odd few drops of rain, but nothing to spoil the joy of being out on the water in one of the most beautiful parts of the world. 

We put out three nets and motored around for twenty minutes or so, waiting for the crayfish to start feeding. We then pulled up the nets one by one, replacing them in different places when found empty. This went on for two rounds and we were almost getting worried about blanking for the day's crayfishing. We had the sum total of four small crabs to show for our efforts. These were returned to the water.

Our fortunes changed very fast, however.

On the fourth round of trekking (pulling up) the nets, we found seventeen crayfish in the net, most under size. We kept two, placed the net in a new location and went to retrieve the next one. This one produced eighteen crayfish, most of which were over size. A haul of biblical proportions indeed!

This went on for the other two nets as well. So we sorted them, kept the largest ones and returned more than forty over sized crayfish to the water. Pity we did not have more licences.

Needless to say, we sailed back to Gordon's Bay on a gentle breeze with a song in our hearts. What a way to spend a day!

Having my share of the haul then called for some careful planning. This was my first ever successful crayfishing trip. Never before have I had fresh crayfish to cook. And it is summer here in the Cape, Very hot.

I decided on a salad style dish, with crayfish fried in garlic butter, served with avocado mousse, salad greens and slices of baguette fried lightly in olive oil. This was accompanied by a Pinot Noir MCC (Methode Cap Classique or bottle fermented) rose. The salad greens from my vertical vegetable garden, of course.

Dessert was to be a fruit yoghurt. We never got that far...
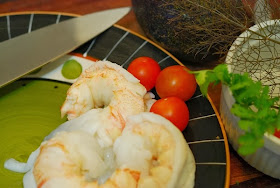
Preparation is a cinch. If you take more than about twenty minutes, you are doing something wrong. The crayfish are parboiled for five to seven minutes, then removed to a cold water soak to stop the cooking process. I used the tails only and discarded the rest. This was not going to be a messy greasy face sort of meal. Make fish stock with the rest if you really are into preservation. You then need to break all the limbs to get the meaty parts out.


Ingredients

3 crayfish
2 heads of garlic, chopped and mashed
1 cup of salad greens
1/2 cup rosa tomatoes
slice of diced strong cheese. Feta or mature cheddar
1 sprig of spring onion
1 dessert spoon coriander leaves
1 small baguette
1 medium sized avocado
250 ml plain yoghurt
1 dessert spoon lemon juice
some olive oil
some cooking oil
dollop of butter
Salt and pepper to taste
Bottle of your favourite dry rose bubbly.


Process

Chill the wine. Most important part of this dish, I should imagine.

Make the avocado mousse first, this will give the flavours time to spread throughout the mousse. Peel and mash the avocado, then use the blender to mix in the yogurt. The mix should not be runny. Add some salt and pepper to taste, then add the chopped spring onion and coriander leaves. Keep a sprig or two for garnish when dishing up. Add the lemon juice at the end. Leave this lot in the refrigerator to develop some flavour while you prepare the rest of the dish.


Parboil the crayfish as described. Cut open the tails and remove the intestines. Then slice the tails into steaks of about 12 mm / ½ inch thick. Heat some butter in a frying pan, then add the garlic. Fry this until the garlic has the proper shade of brown then add a small dollop of cooking oil. This will stop the temperature from rising higher and the garlic butter from burning. Add the crayfish steaks and fry them until they are nice and golden brown. Remove them from the heat and allow to repose while you fry the bread.

Slice the baguette on a slant so you have elongated slices. This does nothing to the flavour, but does add some shape to the end result when on your plate. Heat some olive oil in the pan with the juices from the crayfish. Add the slices and fry them till they are browned to your taste. These may soak up more oil than you anticipate, so keep some olive oil on standby.

Dishing up is as easy as arranging some salad greens on the plate, add a ladle of mousse, a sprig of coriander leaves, the bread and the crayfish.

Voila! A romantic summer dish.

Bon appetit!


Authored by Johan Zietsman

Last updated on 2013-12-20

Saturday, 14 December 2013

Home Baked Bread: A High Fibre Loaf


At last I am back in my favourite kitchen. Home. After two months away and many culinary adventures later, I am back in my own homely little kitchen.

The words do have a cosy ring to it, much like the Mole's place in The Wind In The Willows by Kenneth Grahame. Your own place has this feeling of home.

Having been away for so long, I had this primordial urge for proper bread. I crossed a mental hurdle just before my departure on the last voyage, so the missus hasn't tasted the version of bread I now bake. I purchased a copy of Peter Reinhart's book The Bread Baker's Apprentice some time ago and studied it. You have to open and study the book.

Which means reading intensively several times. Especially the part about what happens when you start mixing flour, water, salt and yeast. I had ample chance to experiment on the voyage, mostly successfully and often very successfully. The challah I made on board could be the best loaf I made to date. I shall certainly strive to top that one.

This time around I decided on a plain and simple loaf. Light Wheat Bread is the heading in the book. The recipe in the book requires whole wheat flour. I do not have flour with crushed wheat, so I used brown bread flour instead. The flours that I use are whole grain, stone ground, unbleached, non-GMO anyway, with the brown bread flour having ample wheat husks to give the loaf a rustic coarseness. Long words to describe decent, old fashioned coarse flour.

I followed the recipe reasonably to the point. I had to use whole milk instead of the three dessert spoons milk powder prescribed in the book. Otherwise the mix is easy and the directions for decision points are clear and easily understandable.

Here at home it is high summer now, with temperatures in the late twenties and early thirties Celcius. There is some mercy, though, in that we have the famous Cape Doctor. The south easterly trade winds, funneling into a near gale over the local Hottentot's Holland mountain range and across False Bay almost every day, cooling us down a bit.


Needless to say, the high temperatures make for very short rising and proofing times. You need to pay attention to the happenings inside the proofing box. Perhaps this fast proofing also makes for less flavour, but that one I shall test when I have space in the refrigerator for a large blob of dough and overnight proofing.

Ingredients for two medium sized loaves


2 ½ cups white bread flour
1 ½ cups brown bread flour
2 teaspoons salt
2 dessert spoons brown sugar
¼ cup whole milk
1 ½ teaspoons (10g) instant yeast
2 dessert spoons vegetable fat (shortening)
1 ¼ cups water at room temperature


Process


Stir together the dry ingredients, then add the water until the dough becomes sticky. Allow five to ten minutes for the dough to develop gluten, then rub in the shortening. The version of shortening that I use is quite hard, so I have to really let it thaw, then rub it into the dough.

Mix the dough thoroughly and make sure that it is reasonably soft and elastic. Knead this until the dough is satiny. Do a window pane test, as Peter Reinhart describes it. Stretch a piece of the dough so it thins out and becomes translucent. The dough should hold this easily. If not, he dough is too dry or too soft. You will know. Add flour or water as needed, knead it in and check again.


When the dough is ready, pat it with some cooking oil against drying out, then cover it and allow to rise for an hour or three. In my case an hour and twenty minutes was sufficient time for the dough to triple in volume.

Knead it down and shape it as required. I divided the dough into two equal pieces, shaped them and popped them into rectangular bread tins. This was covered with a damp cloth and allowed to proof until the dough was standing above the rims of the bread tins. This took about twenty minutes in the conditions prevailing in my kitchen.

Pop the loaves into a pre-heated oven at 230ºC/450ºF, spray a fine mist of water into the oven, leave to bake for five minutes, then spray water again. Turn the oven down to 190ºC/375ºF after ten minutes and bake the loaves for another thirty minutes. If you made thinner loaves, the baking time will be less, so do check on the baking progress towards the end.

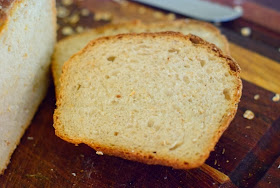
These loaves had a decent oven spring and sprung to one and a half times their starting volume again in the oven. The crust was crisp and chewy, with a wonderful soft and springy crumb. The vegetable fat I use for shortening makes for a much slower drying-out rate, so the loaves last a bit longer than overnight.


However, if you have hungry teenagers or sailors around when the loaves come out the oven, I doubt that you will have to worry about the storage life of the loaves...

And remember, use real butter.


This blog post also linked to
Yeastspotting!


Authored by Johan Zietsman

Last updated on 2013-12-14


Thursday, 12 December 2013

Crossing Another Mental Hurdle: Multigrain Sourdough Loaf


Interesting how we all learn mostly from our own experience. Edward de Bono has written at length about the thinking process and thinking mistakes. And somewhere the idea emerges that problem solving is a process that will get you back to where you were. Progress requires different thinking.

And so it is with me too. I wrote a whole blog post describing a way to get out of a thinking rut in the realm of photography. Then, in the wee hours of the morning when everything is quiet except for the noises from the southeaster howling outside, it dawned on me that perhaps I am in a baking rut too. In a way of speaking.

Nothing out of the ordinary, nothing really wrong. But a definite feeling of having to do something new, something out of the ordinary.

Later that morning, after the early morning chores had been attended to, I opened my copy of Crust And Crumb by Peter Reinhart. The book is a veritable treasure trove on the various processes going on inside the dough. Worth reading several times and keeping it as a ready reference when planning your next loaf.

I decided on a multigrain sourdough loaf. Just for the difference in process and a new way of preparing the dough. I have never made bread that took longer than a morning or so, from preparing and kneading the dough until the baking is done. This was a going to be a first for me.

The project started off with feeding of the sourdough to wake it up. Then it was fed twice a day over two days. I decided on a biga style sourdough, which resembles a dough, rather than my normal batter-like sourdough. By the evening of the second day the biga was almost walking out of the refrigerator, so I popped it into the freezer. I had to slow things down a bit, as I was not going to stand kneading dough in the middle of the night!

The next morning the biga, now frozen solid, was taken out to thaw. I cut the block into smaller pieces to get it thawed quicker.

In the meantime I gathered the rest of the ingredients. Quite fun, as we do not normally have the ingredients listed in the recipe as standard items on our grocery list. However, the book says one is free to experiment. So I did.


I did have some left-over cooked basmati rice, which I used. Then I added some maize meal as the coarse corn flour part. Braaipap for my South African readers. You may substitute this with some corn flour that is used to make tortillas. We can't make tortillas with the maize meal we have here, and you can't make mieliepap with the stuff they sell in Mexico for making tortillas. But for this bread it is all about the flavours.

There were also semolina, rye flour, brown bread flour complete with some bran and rolled oatmeal in the multigrain mix. You may experiment, but keep it to the quantity listed in the recipe, otherwise you may find that the loaf is very brittle as a result of too little gluten in the mix. The ratios given in this recipe is an indication only, experiment to your heart's delight.

I also added two tablespoons of vegetable fat to the mix. This helps with keeping the bread from drying out too fast. It then lasts for some days instead of drying out overnight.

The instant yeast is just one sachet. Here in South Africa it comes in 6 gram sachets, which translates to 0.16 ounce. Bear in mind that there is already some very lively yeast cells working in the dough, so this is just a booster. As for the buttermilk, the recipe calls for ½ cup,which I doubled. This left me with a trickle of buttermilk in the container. Next time I shall add all of the buttermilk and adjust the water content in the dough. In the quantities I used, this will not make a huge difference.

In terms of the process, I tried to follow this within reason. Mixing is by hand, so is the kneading. The quantities given in my book were doubled to make three medium sized loaves.

This experiment resulted in the best sourdough loaves I have made to date. The multigrain content provides a palette of flavours, ending with a sweet after-taste. This bread also got discernibly sweeter the longer you chew on it. A wonderful recipe, definitely a keeper for me.

And now I have a much better understanding of how to treat my sourdough!

Ingredients


For the multigrain blend


¼ cup rye flour
½ cup rolled oats
¼ cup semolina
¼ cup brown bread flour
¼ cup maize meal

For the main dough


4 cups biga-style ferment
3 cups of unbleached white bread flour
1 ½ cups multigrain blend
4 tablespoons cooked basmati rice
4 tablespoons brown sugar
2 ½ teaspoons salt
6 gram instant yeast
1 cup buttermilk
3 tablespoons honey
2 tablespoons vegetable fat
½ to 1 cup of water
Some rolled oats for garnish on top
Some cooking oil to pat the dough against drying while rising.

Process


Mix the biga into the other ingredients. I normally add the vegetable fat only after a few minutes, giving the gluten time to develop. Otherwise you may also end with a brittle crumb in the loaf.

Knead the dough until it becomes satiny. You will find, as the book describes, that the dough is quite gritty in the beginning. This is due to the coarseness of the multigrain mixture. This coarseness will disappear as you knead. I follow the advice of Peter Reinhart by testing the dough for elasticity. He calls it the window-pane test. The dough should stretch to a translucent state and keep the thin membrane. If it doesn't, then it needs more kneading or the dough is too dry. I don't have fancy equipment or a controlled environment, so this look and feel method works for me.

Incidentally, from another source I learnt to taste the raw dough. If it does not have a pleasant taste, something is wrong. In my case, it is the quantity of salt. But this method works well. Pleasant tasting raw food normally results in very good tasting cooked food.

This dough is supposed to be about 65% hydration, so it is on the soft side, but still knead-able. This mix of mine came out nice and elastic and I was just able to fold it. This was left to rise for ninety minutes or so, by which time the volume had more than doubled. Remember to pat the dough with some cooking oil against drying out during the first rise.

I folded this a few times without jarring it to get it back to the almost the original volume. This ball of dough was then divided into three balls. These balls were shaped by rolling and folding them into a flat cylinder shape to fit the bread pan.

I used greased bread pans and then dabbed some oil on the tops of the loaves again. These were left to rise until the dough protruded above the bread pan rims. Add some rolled oats as garnish and pop these into the oven.

I nowadays use both top and bottom elements in my oven, no fan, and I spray some water into the oven. These loaves were baked in the oven pre-heated to 230ºC /450ºF for ten minutes, then the temperature was turned down to 175ºC /350ºF for the rest of the baking period of forty five minutes to one hour. The oven was misted on introduction of the loaves, then again at ten minutes and fifteen minutes. Depending on the shape and size of your loaves, the baking time may vary. Check after forty five minutes to see if the loaves have baked through. They sound hollow when tapped and should have a nicely browned crust.

Turn them out to cool for an hour before slicing them. They are full of steam and quite brittle when they emerge from the oven, so don't be tempted to slice them. You may just spoil a very good loaf into a brittle mess.

And remember, use real butter!


This blog post also linked to Yeastspotting!

Authored by Johan Zietsman

Last updated on 2013-12-11

Thursday, 5 December 2013

Photography: How To Get Out Of Your Zoom Lens Rut


 And get lucky in the process. You never know.

We all go through this every once in a while. You get in a rut. Using one favourite zoom lens for all the shooting.

Stereotype thinking.


Shooting landscapes? Use your wide angle lens. 24-85 mm. Medium distance subjects? Use the 70-200 mm lens. People? 24-70 mm lens. All zoom lenses. And the photography manuals and popular press proposes this, thereby probably exacerbating the problem.


Don't get me wrong. I am not against using standard type lenses for certain work. I am also not proposing that my examples are correct or wrong. What is happening is a slavish following of what the press says and no application of your own mind. Following the crowd, perhaps. That is the issue we are discussing

I am seeing more and more people carrying DSLR cameras, using them in point and shoot mode. A compact camera would have been a better bet, but fashion dictates otherwise.


But this is not the real problem. The real problem is that we all, to a certain extent, use but part of the capabilities of our equipment. Include your tablet and cellphones here. This introduction is meant to illustrate the extent of the rut we create for ourselves.

Coming closer to home, I also suffer this malady from time to time. Some years ago I made it a compulsory exercise for myself to go out and use other items in my small inventory just to keep the hand in. so to speak.

One of the exercises is to take a fixed lens and shoot an essay using only this lens. Zoom with your feet. Thirty minutes maximum. Then narrow the options down by choosing some interesting part of the day or some interesting subject. In this case I did both.

I don't own a lot of lenses and equipment. My inventory consists of a Nikon D80 camera,  a 70-200/ f2.8 lens, a 50 mm/f1.8 fixed lens and a 18-135mm/f3.5-5.6 kit lens that came with the camera. The kit is rounded off with a reasonably sturdy tripod and a cable release. I also invested in a SB900 flash. Simple kit, nothing elaborate.

But even with this simple equipment I found that I was increasingly using the two zoom lenses and that the fixed 50 mm lens was lying idle in the camera case, gathering dust. So the forced exercise was to make an essay out of images of the flowers and other things in my garden. After sunset, with dusk setting in fast. We were living in Pretoria at the time and it was around six in the evening. The sun was below the horizon already and darkness was closing in fast.

Some excitement into the fray.


I chose the fixed lens as the main challenge and also because I was forgetting how to use it and what images one can get. And the object of the exercise is exactly to keep at the game and understand your equipment. And besides, this little lens is a gem in the sharpness of the images I get for the price that I paid. Almost like an open trade secret that we all forget from time to time. In a manner of speaking.

I opted not to use the flash, as the experiment was to create images using the available light. Another learning experience. Of course, use of the tripod and cable release were mandatory in those conditions. I also shoot exclusively in RAW mode, as this gives me post processing advantages in that I get the image straight from the camera with all the lines very well defined. No internal dithering or such like to compress the images. That I can do myself in ways that I decide.

I used a copy of Lightroom on a friend's computer for the post processing capability and forced me to concentrate on what I was doing before pressing the button.


Needless to say, there was a lot of experimenting on the day. Flowers are relatively easy to photograph, but not in low light in a breeze. Luckily the breeze kept still for long enough to get some decent images. I also managed to photograph one of our cats, who mercifully sat quite still for long enough to get an image. Normally they would be chasing insects or each other at that time of day, making it almost impossible to get in a shot. They also do not like the shutter noise from the camera and keep on dodging me when I have the camera in the hand.

The essay resulted in everything that I expected, and then some more. The images were sharp where I intended them to be, quite colourful with vivid colours, even in the low light of the dying day. The compositions were what I intended them to be, so there was hardly any cropping to be done. Less post processing required and I get the full advantage of all the pixels in the camera sensor.

I can live with that.

And then there was one little white speck on a red flower that I could not fathom where it came from. Zooming in during the post processing revealed a gem of an image, requiring only a little sharpening for the full effect.


A tiny white spider standing in a very aggressive stance, facing the camera straight in the eye.

This made the whole exercise worth more than I expected. A large reward for the little extra effort of compiling the photo essay.

You never know what you may get when you pose these challenges to yourself. And quite a worthwhile exercise in general. It certainly widened my perspective on my equipment. No pun intended.

What are you doing to get out of your mental rut?

All the pictures of the flowers were taken with a Nikon D80 camera using a 500mm/f1,8D lens, center weighted metering, manual mode, ISO 125 and shutter at 1/40 second. The photo of the cat was taken with the same camera, the ISO set at 200, 50mm lens at f/1.8 and shutter speed at 1/30 second. The light held long enough to complete the essay.


Authored by Johan Zietsman.

Last updated on 2013-12-06.