Pages

Monday, 29 July 2013

The Avocado Challenge: Ziets' Twisted Ritz


When last did you have avocado other than plain or in guacamole? Well, here is an idea in answer to the challenge from the the ZZ2 farming group.

There is a plethora of recipes for avocado and the challenge here was to come up with something new.

In my mind, that calls for simplicity, otherwise people may not make the dish. Simple ingredients, simple processing, great taste. Those are the basic requirements. Of course, the plating and dishing up of the food is up to the individual cook. If you are just plain hungry, just chuck everything together and dig in.

However, in my view one has more pleasure from a dish than just throwing everything together. “Moerbeikos” is the Afrikaans slang word for food slapped together. A bit derogatory. A dish like this deserves some TLC, I would imagine. Especially if it will be served to your loved ones.

I thought up this version of avocado Ritz as a low fat, almost organic, version of the classic dish. And there is no mayonnaise. Just fresh, wholesome seafood, chourizo, yogurt and salad leaves. Add some real butter, salt and freshly ground pepper, not forgetting the requisite avocado, and you have a delicious tangy starter or main dish. In my house, I earned the nickname of the Hungry Sailor, so ours was a main meal. Copious amounts of the dish.

This one I call Twisted Ritz, in memory of the huge quantities we consumed while working in Nigeria. You can have this dish every day in that part of the world. Which is why I had to engage in a serious exercise regime to keep my weight down.

But that is a different story.


I used shelled prawns, as these are easier to eat. But you may use prawns in the shell for the looks. Makes for messier eating, which I am sure will add to the whole eating experience. Bear in mind that the prawns shrink somewhat during cooking, so make sure you cook enough.

The chourizo may be substituted with any spicy sausage. This is what makes the dish slightly spicy. If the sausage is not spicy enough, add some dried chilli powder or cayenne pepper. Beware of overdosing, though.


I used salad greens from my vertical vegetable garden. If you don't have a garden, just buy some mixed salad greens from your favourite greengrocer or food deli.

The quantities given will make 2 full portions or 4 starters.

Twisted Ritz ingredients

1 small avocado
250 ml plain yogurt
2 teaspoons lemon juice
pinch  of salt
freshly ground pepper to taste
1 cup prawns
150 mm length of chourizo, sliced into thin wheels
1 clove fresh garlic, chopped and mashed
dollop of butter for frying
salt
freshly ground pepper
Choice of any or all of the salad leaves below:
Lettuce, assorted
Fennel
Rocket
Spring onions
Grass onions


Process

Peel and dice the avocado. Add all the yogurt, some salt, the lemon juice and some pepper. Whisk until the mixture is nice and smooth. Then put it aside to rest and develop flavour.

Keep your fingers out of it, otherwise there may not be sufficient left over to dish up!

Melt some butter in a frying pan. Fry the mashed garlic until it becomes slightly brown, then add the chourizo. Fry the chourizo until it has a nice brown tinge, then remove from the pan. Add the prawns directly to the juices in the pan and fry them in turn until brown. The prawns will shed water at first and will be cooking rather than frying. No reason to fret, just wait until the water has boiled away and carry on. Prawns taste better after being browned in butter.

The dishing up part is where the cook's personal artistry comes into play. I arranged some of the salad leaves in ramekins, then added a dollop of the avocado mousse before adding the prawns and chourizo.

Garnish with some of the chopped spring onions and serve with a fruity dry white wine.

Voila, a new, healthy avocado dish!

Bon appetit!


This blog post compiled in answer to the ZZ2® Afrikado blogger challenge. Please vote for me at the ZZ2 Afrikado Challenge Facebook page.
Authored by Johan Zietsman

Last updated on 2013-07-29


Saturday, 20 July 2013

Is Light Sourdough Bread A Myth?


Perhaps the holy grail of all bakers: how to make a light loaf. This prize has been escaping me for a while now. Even after extensive consultation and blatant, overt picking of brains, my loaves came out on the heavy side. Whatever yeast I was using, the problem remained. Sometimes the loaves did come out reasonably light, but not light enough to my taste.

That is, until two days ago. I reasoned that the problem did not lie in my understanding of the oven and heat flow, nor was it vested in the ingredients. Therefore the problem had to lie in the process. So I sat myself down and started thinking.

I do knead the dough enough. Kneading for fifteen minutes appears to be OK. The starter or sponge also appears to be OK, with lots of large fermentation bubbles. So does the first rise, with a volume increase to almost triple the original volume.
So the problem should lie after that part of the process. After another round of consultation with my baker friends, I realised that I am treating the dough too harshly after the second rise and the loaves simply fall flat.
A bit like “listen to your Grandma, lest she box your ears like she did in your younger days.”

I then made up another batch of dough, following my normal mixing and rising regime. This time I allowed a full ten minute rest after turning the dough out on the kneading board. The dough was then gently folded. It was a soft dough after all. No added flour except for that which the dough picked up from the kneading board.

This lot was then split into two small humps and formed into loaves. These went straight into the bread pans and then back into the cold oven for the second rise of four hours.

This time I hit pay-dirt. The loaves rose perfectly. I took them out of the oven to allow the oven to get up to heat of 190ºC/ 374ºF before baking. My bread likes to go into a hot oven with some steam or a cup of boiling water in the bottom of the oven.

The loaves baked for 35 minutes and was then summarily taken out of the oven and turned out to cool on a cooling rack.

Tapping the loaves already gave me the right indication of success with a nice hollow sound. After cooling, the loaves were nice and spongy to springy, not hard.

And the proof was in the cutting of the first slice. Very light and airy. The lightest loaf I ever baked. A lesson well learnt, albeit the hard way.

Now for a repeat performance. In sourdough baking, the learning never stops.


This blog post also linked to Yeastspotting!

Authored by Johan Zietsman

Last updated on 2013-07-20

Sunday, 14 July 2013

Baking Sourdough Ciabatta After Consulting My Baker Gurus


Perhaps I should have called this post 'Making Headway Against The Vagaries of A wild Sourdough.' But this is not a lamentation.

I actually have two experienced bakers to consult. Not too shabby. So between the two sets of advice and my trusted copy of Classic Sourdoughs, Revised by Ed Wood and the late Jane Wood, I set out on my next affray into the wonderful world of baking with sourdough.

I have the oven temperature and the spritzing with water under proper control. Ditto for the dough mix. And I am getting a wonderful fermentation of the starter as well as the main rise. I mix about a cupful of the mother with another cupful of flour for the starter, adding just enough water to make the starter somewhat runny. I go with personal judgement on quantities; this is worth about two cups of dough in the final mix, so I am not too worried about exact quantities.

This lot is left out on the kitchen counter for six hours or so. I judge readiness for the main mix by the size and quantity of fermentation bubbles in the starter. The starter should look quite spongy with bubbles bigger than 6mm (1/4”) The main mix is a different story, though.

The main mix consists of the starter plus two cups of white bread flour and two cups of stone ground, whole wheat brown bread flour. Long words, but the mix here is more critical to the end result. I add just enough water to make a soft dough. This dough is folded, not kneaded. I keep at it for at least ten minutes. The dough becomes sticky, then elastic. I keep on folding for another five to ten minutes.

This time the main mix included two dessert spoons of olive oil in addition to two teaspoons of salt. After all, ciabatta being Italian, there has to be olive oil for the fatty  or oily part of the ingredients. This to make the bread more elastic, was the advice. The main rise was overnight in the oven. My oven being the most controlled place in terms of temperature, even though it is switched off.

In this case, I tried a new approach. The ambient temperature in the house is around 18ºC (64ºF). I understand that one wants to have a warm atmosphere for the first part of the fermentation, then something colder for the last part. Well, not having a large refrigerator, I made a rudimentary plan.

I patted the ball of dough with olive oil against drying out, then put the dough in the mixing bowl with the lid on. This lot went into the cold oven. I then switched on the oven to get the temperature up to 50ºC (122ºF). When the oven was up to temperature, I simply switched it off again. This gave me an elevated temperature for at least six hours, cooling down gradually overnight. This was a very successful experiment. The dough rose to almost triple the original volume in twelve hours.


I turned the dough out on the kneading board and let it rest for a while before kneading it down prior to the second rise. This mix appeared to be a bit runny still, so I kneaded in another ¾ cup of flour. This got the dough into a consistency more to my preference for this stage. The second rise was for four hours, during which the dough again more than doubled in volume. I considered this as positive feedback from nature on my process!

The dough was then formed into two flattish loaves. I divided the dough, then flattened each half and rolled then loosely into a flat loaf. The idea was to catch more air bubbles in the dough during the loose rolling. This worked well. The two loaves were rested for the time it took to get the oven up to temperature. This time I used a lower heat than before, around 180ºC (350ºF). The advice from my baker friends was that the loaves are thick and therefore need time to heat up and bake inside.

I heeded the advice and was pleasantly surprised with the result. This was also one of the few times ever that I started the loaves in a hot oven. Normally I would start from a cold oven, reasoning that there would be more time for oven spring as the oven got hotter. However, this last experience indicates that a hot oven from the start works better. I still have a small steel cup with boiling water in the oven to provide steam. This works well.

The loaves rose a little in the oven at the beginning. They came out very nicely browned, with a chewy crust and a reasonably airy crumb. The flour mix was just right and the flavour wonderful.


My next experiment would be to get these loaves lighter. I have some ideas. Come visit again, we are having fun!


This blog post also linked to Yeastspotting!


Authored by Johan Zietsman

Last updated on 2013-07-14

Wednesday, 3 July 2013

The Vertical Vegetable Garden


Being on a sabbatical has some enjoyable perks. Like getting up early to have a small breakfast and see the missus off to work, then taking an early morning nap. Add to this the incapacity associated with a knee operation and things get really interesting. You can't really work hard, even if you want to. Your body just stops. Which of course limits your sailing time.


So then one has to think up new projects that are not too strenuous. Being a food blogger, the idea of a garden comes to mind. But we are living in a duplex flat (“double storey apartment in a building” for my overseas friends), so a normal garden is simply not possible.

A brief search on the internet revealed a multitude of ideas around vertical gardens. Living walls in cities, apartment buildings with large flower pots on every balcony, each complete with a medium sized tree. A living vertical forest. Check more images here.

More ideas came from using two litre soft drink plastic bottles, festooned in various orientations, planted with the flowers or vegetables of choice.


I eventually decided on using a pallet, as I have a suitable courtyard wall to hang it on. Two simple brackets over the single brick wall will do the suspension job just fine. This will also leave me with the option of adding another pallet later and moving the two around to fit aesthetically. No use having an ugly garden!

I chose a pallet with narrow openings between the slats. This gives me some distance between the rows. You don't want too large gaps between the slats of the pallet, otherwise you need a lot more plants from the word go to keep the soil in place. This will drive up the cost of your garden substantially. For example, double the width of the slots will require double the amount of plants and therefore doubling the initial cost of the plants. Which is the biggest part of your expenditure.


The pallet cost me R10 from the local tile shop. The landscaping cloth cost in the region of R15/m and the mesh about R60/m. The soil cost around R25/bag. The plants cost in the region of R500, depending on what and how many you buy. I also bought some soluble organic fertilizer. You will need this as you are not able to spread it as in a normal garden. Brackets for mounting on the wall are reasonably cheap too. You will need to figure out what is required before you start your garden. The garden is too heavy to experiment with once it is assembled.


The construction is relatively simple. And you need the minimum of tools. In this case, I used a strong pair of scissors, a pruning tool and some thick staples. That's it. Simple.

You need sufficient soil to fill the volume of the pallet, so you may need to do some simple calculations.

Materials 


1 pallet, roughly 1m x 1m. That is what fits in my car.
1 running meter landscaping cloth. These are sold in 1m wide strips.
1 running meter plastic mesh. These are also sold in 1m wide strips.
1m x 1m plastic sheeting
2 bags potting soil
1 bag organic mulch
1 bag bone meal

Construction


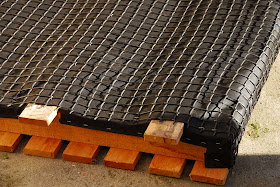
Start by stapling the landscaping cloth to the underside of the pallet. This will become the back of the garden hanging against the wall. Take care to also cover one open end of the pallet. This will become the  bottom of the garden.

Over this staple the plastic mesh. This mesh will provide the strength at the back to keep the soil inside the pallet. Then over all of this you need to put a cover of plastic sheeting. This will prevent your hanging garden from staining the wall.

Now turn the pallet over so that the top part is facing upwards and fill with your mixture of potting soil, mulch and bonemeal. This is a somewhat tedious job, as you will be filling through the slats of the pallet. Work the soil to the bottom of the pallet. I picked up the open end  of the pallet and gave it a little shake to get the soil lower towards the bottom. But I am strong enough. Be careful, this garden is quite heavy. If you are not strong enough, just work the soil downwards with your hands through the slats. It helps if you have small hands!

Once you have the soil nicely settled in, you can start planting your garden. You want perennial plants, as it is not easy to replant your garden. Of course, you need to decide on a variety, like I did. Rather in an impromptu and haphazard fashion. I forgot to get parsley, which is why I need to make another round of the garden shop.

I opted to plant the lower rows with smaller vegetables and having the larger ones to the top end. I reasoned that this will allow the bigger plants some more space to go while not interfering with the smaller ones.

Space the plants close together and make sure that they are individually tamped down properly. Remember, you are going to tip this lot up to vertical, so there must not be gaps inside for the potting soil to go. And the plants are all that is keeping the soil inside on the front side.

This, incidentally, is also the reason why you need to wait three weeks at least before hanging the garden. The roots need to grow and hold the soil and themselves in place. So you need a good root system, which is why you add generous amounts of bonemeal to the potting soil mix.

The garden can be watered by normal ways when still flat. I propped mine up so that there is an incline. This will hopefully also allow the soil to settle as you water the garden every day. I use a small watering can to water the garden. You don't want to wash the loose soil out of the pallet. Once the garden is hung up, you water only from the top. Add fertilizer once a week or once every two weeks, as per usage instructions.

Some people add a piece of plastic guttering at the bottom of the hanging garden to catch any water coming through, then feeding it back at the top. Makes for much less waste of fertilizer and you get a more effective garden, but at the cost of having a more complicated system. I kept this one simple, as it is my first one and therefore a bit of an experiment.

Voila, you have a garden!

Now the waiting starts. Perhaps I shall be able to harvest some leafy stuff in three weeks' time. An afternoon spent in gainful activity, even though my knee is badgering me.


Authored by Johan Zietsman

Last updated on 2013-07-03